 Nero 7: Create a DVD-Video music disc from multiple audio CDs
Nero 7: Create a DVD-Video music disc from multiple audio CDs
May 11, 2007
[Note: Some features may require Nero Vision 4.9.5.7 and Nero ShowTime 3.5.5.1]
This note describes how to combine several audio CDs to create a DVD-Video slide show preserving the original CD-DA (16 bit/44.1 kHz) audio quality using Nero 7 Ultra Enhanced software. Since a CD-R disc holds 700 Mb while a DVD+_R disc holds 4.7 Gb, it is possible to merge 6 or 7 audio CDs into a DVD depending on the number and size of tracks on the audio CDs and the size of graphics used for the DVD-Video. The DVD-Video will be playable on any standard DVD player as well as on any DVD-rom computer drive. While it is easy to create CD and DVD MP3 "music" data discs which can respectively hold roughly 200 and 1300 standard (128 kbps) encoded MP3 audio tracks, and which are also playable in recent DVD players, the emphasis here is in preserving the quality of the original uncompressed compact disc digital audio music.
- Rip audio CDs to wav format:
Rip the music CDs to uncompressed 16 bit/44.1 kHz wav files using your favorite music program (Windows Media Player 11, Creative MediaSource, EAC (Exact Audio Copy) etc..). Save the wav files for each CD to a different folder. Make sure the ripping format is wav (uncompressed LPCM) and not MP3 or WMA. Hint: If the ripped wav file name is prepended with the track number, the audio tracks (chapters) will be automatically ordered correctly with the slide graphics. Most music programs have an option to adjust the ripped file-name format.
- Select Nero "Make Photo Slide Show (DVD)"
Each audio CD will be added as a separate slideshow title to the DVD compilation. Each slideshow title will contain a number of slides (chapters) equal to the number of tracks on the corresponding audio CD.

- Import Title and Slide (Chapter) art and ripped wav files to Media dialog box:
Drag the title and slide graphics for the current audio CD into the Media dialog box. Each slide image could be different (e.g. it could be an image of the track lyrics) but for simplicity, a single slide graphic can be used and later annotated with header and footer text if desired. In this example, the same slide graphic "tracks1" will be used.
Drag the ripped wav files into the same dialog box. Add the slide graphics sequentially using the + "Add to Project" button in the Media box. If using the same slide for each track, quickly click the + button several times equal to the number of tracks on the audio CD (example below has 27 tracks on the CD):
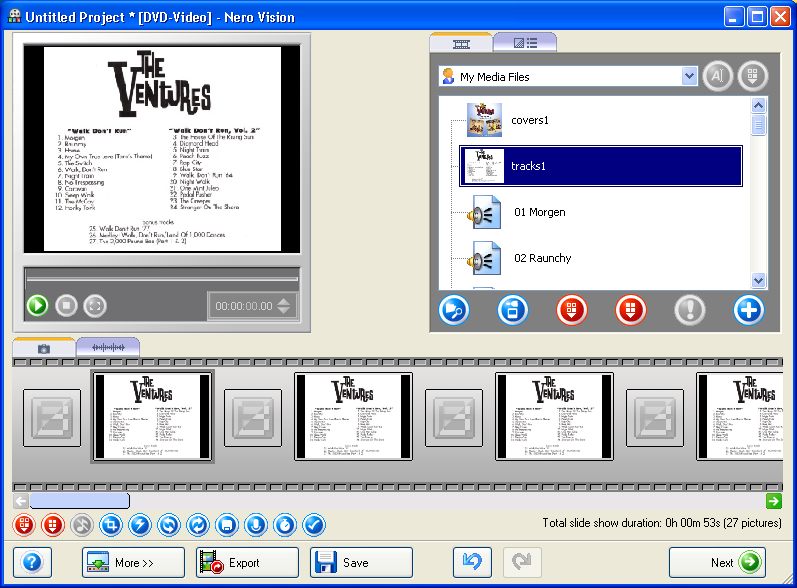
- IMPORTANT: Set default image duration to the audio "commentary" track:
Click the stopwatch "Duration Settings" button and check BOTH the "Fit picture duration to commentary" and "Apply to existing pictures". This is important as otherwise, each slide will have a fixed default length of 2 seconds and the audio track will be truncated!:

- IMPORTANT: Set the audio encoding to uncompressed (LPCM):
Click the More>> button, select the Video Options button, select the DVD-Video pane. In the Audio format: section, select LPCM. This is important as otherwise, the audio will be Dolby (AC3) encoded and the audio quality will be compressed and poorer quality. During the DVD-Video creation, the 16 bit/44.1 kHz audio tracks will automatically be upconverted to 16 bit/48 kHz as required for the LPCM audio track in the DVD-Video standard.
- Add the audio tracks to the corresponding slides in the title:
In the Media dialog box, select all the audio tracks (should be the same number of tracks as slides already added to the Content area). Drag this group of highlighted wav files to the first slide in the lower Content area. The wav audio files will be associated sequentially, as audio "Commentaries" to the slides. Each slide will have a duration equal to the duration of the associated wav file. (Note that we are adding the audio as Commentary audio associated with each slide. Nero Vision also supports an overall independent "background" audio track, which is not used in this approach). Note that the "Total slide show duration " field at lower right has changed now to reflect that slide duration setting above. Now select any of the slides and click the properties Check button (or right-click and Properties) to ensure that the slide duration is different for each slide. The Properties dialog box for each slide can now be used to add custom Header and Footer text to each slide if desired. Note that any Header/Footer text, in the Preview window can be moved around by dragging. Preview the title if desired. The overall duration should be about the same as that of the corresponding CD, roughly 1 hour for a typical CD. This will consume about 700 Mb of space on the target DVD.

- Add slide transitions:
Slide transitions with various effects can be added between tracks and the timing between tracks adjusted. However, without any explicit transitions added, there appears to be a default 4 - 5 second interval between tracks as in a standard audio CD.
- Click Next to show the overall DVD-Video project layout screen, showing the first Title. The disc space usage bar at the bottom should show about 0.7 Gb of used space. Select "Make Slide Show .." to add another slide show title and proceed as above for each remaining CD. (Hint: For ease of navigation, remove the previous chapter art and audio files from the Media dialog box. This does not remove them from the first Title. Don't remove the Title art. It will be used later for the Menu navigation art.).

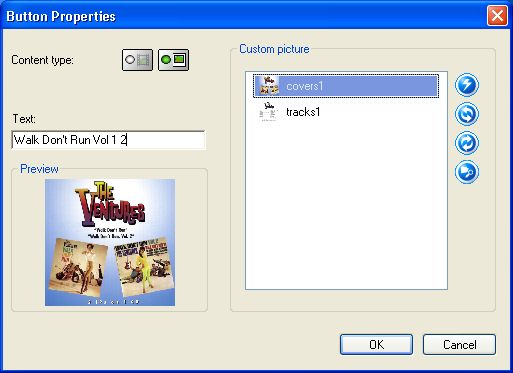
- When all CDs have been added as separate titles, one CD per title, proceed to the Main (title) Menu edit window. Change the main menu Header title to reflect the overall CD compilation description. Select each title graphic and select Properties to change the title text and title graphic (which is initially set as the first slide graphic). The menu page will be in multiple pages, if you have added more than 4 slide show titles. Make sure to edit all titles on secondary menu pages:
- Proceed to the Preview window and then to the Burn Options window and quickly verify the Details information. Burn to your DVD burner drive or to a hard-disk Image Recorder (for later image burning). The conversion to DVD-Video format will take some time, anywhere from 1 to 4 hours depending on your computer hardware. The 16 bit/44.1 kHz audio tracks will also be upsampled to 16 bit/48 kHz as required by the DVD-Video audio standard for LPCM. (DVD-Video LPCM audio standard also supports 24 bit and 96 kHz sampling, but currently Nero Vision does not support that quality).

Example of 5 audio CD compilation to DVD-Video
DVD-Video discs created this way with multiple slide shows as separate CD albums can be directly played on most standard DVD players. The audio line-out connections of the DVD player should be connected to a high-quality sound system to realize the quality of the uncompressed audio tracks. Navigation through the albums (titles) and tracks (chapters) uses standard Menu, Display, arrow and number keys on the DVD player remote control.
The DVD-Video music disc can also be played on any DVD computer rom drive with associated video software. The example below shows screenshots of displays using Nero 7 ShowTime 3 with an older DVD rom drive on a Dell laptop computer.
This example was compiled with 5 titles, from 5 CDs, one title for each music CD and each title (album) containing 27 tracks (chapters)

Nero ShowTime 3 video window showing first page of Title Menu

Nero ShowTime 3 control panel with video window during playback of Title 1 Chapter (track) 12. Note the DVD-Video status and PCM indicator.

Nero ShowTime Title browser showing Titles (albums) and Chapters (tracks). Windows Media Player 11 shows similar information during playback of this type of DVD-Video compilation.